There are a number of reasons why one may decide to move their website to another web host. While some site owners have only one reason, others have multiple for making the decision to transfer to a new provider. Some of the reasons we have found are pricing, bad performances, poor customer service, constant upselling, lack of resources needed for expansion, etc.
As expected, a lot of fears come to the mind of a site owner when they want to migrate to a new host. Some find the processes quite stressful and usually do not know where to start from. This can be due to the lack of the technical skills required. Others are afraid something could go wrong with their website during the transfer. Well, these are all valid arguments, in our opinion.
Hence, after a lot of research, we were able to compile the process of migrating a website to a new host. This guide will work for transferring a website to another hosting provider in 2026 regardless of the CMS platform in use. It also provides a way to migrate your website to a new web host without experiencing downtime.

1. Get a New Host
Transferring your web hosting is not possible unless you have already decided on who the next provider is. Many factors should be considered when choosing a new host.
The first thing is that you must ensure that you have seen evidence that it excels in the area(s) where your current host failed. In addition to that, make sure it is excellent in other areas where your current host performs well. This will, by all means, make it so that you don’t choose a host you would be dissatisfied with in the future.
After you have chosen a hosting provider, you need to register an account with them. This account should have a subscription plan with the resources and features you need for your website. Afterward, you need to install your preferred software on the domain name you want to use for your website to ready it for migration.
Are you not sure of the best hosting provider to migrate to yet? Here are the top options we recommend in 2026;
Hostinger
Hostinger is an all-around hosting provider to trust for your website in 2026. It is an affordable host that provides great services with the best value for money among competitors.
Thus, it is a great option if the reason you want to move your site to a new host is pricing. Hostinger is also an excellent host for website owners who need top performance, commercial-grade security features, outstanding customer support, and unmatched ease of use or management. You can check our in-depth review of Hostinger services for more information.
There are several ways to migrate a website to Hostinger. These ways are;
- Uploading files and databases manually (we will discuss it generally on this page)
- Requesting a free migration done by experts
- Using a migration plugin (for WP sites)
You can take advantage of Hostinger’s free migration service to transfer your website to them with ease. To use this service, all you have to do is have an active paid plan where the site will be installed. Then, you need to submit a migration request by providing either the backup files for your site or the control panel login details (WP, cPanel, WHM, etc.). Hostinger will migrate your website to their server for free within two business days. The best part is that you can submit unlimited websites and Hostinger will transfer all of them for you.
Check out our step-by-step guide for transferring a site to Hostinger.
SiteGround
Another web host we recommend moving your site to when you need a new provider is SiteGround. SiteGround is a performance and security-focused web host that operates from Bulgaria. This provider delivers services to websites worldwide and powers a great percentage of the internet with about two decades of experience.
SiteGround is usually the host you change to when you need to improve the performance, security, resources, and ease of management of your site. It is the best host to trust for outstanding technical support from hands-on experts as well.
Migrating a website to SiteGround can be done using three methods as well. They are;
- Manually uploading files and databases
- The auto-migrator plugin (for WP sites only)
- Free limited migration service
Unlike the Hostinger free professional migration service, SiteGround’s offer is limited by time. This means that after some time, the free migration offer on your SiteGround plan will expire and you will need to pay a fee to transfer your website. To move a site to SiteGround with their support for free, you need to submit a migration request ticket. This ticket will include information that the technical team can use to access your site files. The migration of your website may take between 24 hours and five business days to complete. The support team will contact you once they are done with the process.
For WordPress projects, you can install the SiteGround auto-migrator plugin on your existing website. In your SiteGround Client Area, request a migration and copy the token. Paste this token in the plugin on the site and watch the migration occur. It may take a while to complete depending on the site of your website. Once complete, you can test your website to ensure that everything works as it should.
See the step-by-step guide for migrating a site to SiteGround in 2026.
Migrate Your Site to SiteGround
InMotion Hosting
InMotion Hosting is a top choice for a new host. It combines affordability with excellent performance and reliability. InMotion Hosting has many powerful servers with configuration and features for handling resource-demanding projects with ease. So, it is a perfect new host to move your website to when your current one has little room for expansion.
InMotion Hosting allows you to migrate your site to them in the following ways;
- Using the limited free migration service
- Using a third-party plugin for a WordPress site
- Uploading your files and databases manually
InMotion Hosting provides only one free migration service. Here, you need to provide them with the backup files of your website and they will handle the uploading for you. The migration service can only be used once and subsequent requests attract a fee of $199 each. In order to migrate multiple websites for free, you will have to make the request at once.
However, you must have the backup files of every site you want to transfer to them and upload these to your account. You can then request a data restoration service, which is free of charge.
Migrate Your Website to InMotion
2. Export the Necessary Files
Once you have signed up for the desired plan with your new host, the next step is to create a backup copy of your entire website. The goal of the creation of this copy is to mirror everything you have on your website. This ensures that you are copying every single thing on your website such that after the transfer, there won’t be a difference between your content/files at the old and new hosts. Always ensure that you export all the files and do not make any changes to them before uploading on the new host.
File Transfer Protocol (FTP) clients like FileZilla are usually used to download and upload these files to the disk of servers seamlessly. Luckily, these clients are mostly free of charge and accessible to everyone.
You should note that some web hosts have built-in File Managers that will let you export your site’s files without the use of any FTP Client. Examples are Hostinger and SiteGround.
If you are using an FTP Client, the first thing you want to do is to create a folder for the files you want to export, especially when doing it one after the other. This is recommended, especially if you have a very big website, and exporting everything at once will create a big file that would be difficult or time-consuming to download.
Once you have a dedicated folder on your computer, you need to find the FTP login details for your website. Usually, an FTP account is created automatically and is available when you need it. At other times, you may have to create a new one or at least reset the password of the existing one if you don’t remember. The FTP details you need for a successful login are the host URL, port, username, and password.

After logging into your server through the FTP Client, you will see two websites. The Local Site (left-hand side) will show the folders and files on your computer while the Remote Site (right-hand side) shows your server’s content.
On the Local Site part, open the folder you created for the files. Then, start moving the files and folders from your Remote Site to it one after the other. You can move them by either using the Download option or dragging the file/folder to the destination.
Access to the Download option is possible by right-clicking on the file/folder and choosing Download from the dropdown. You must open the destination folder on the Local Site to ensure the download goes to the right place.
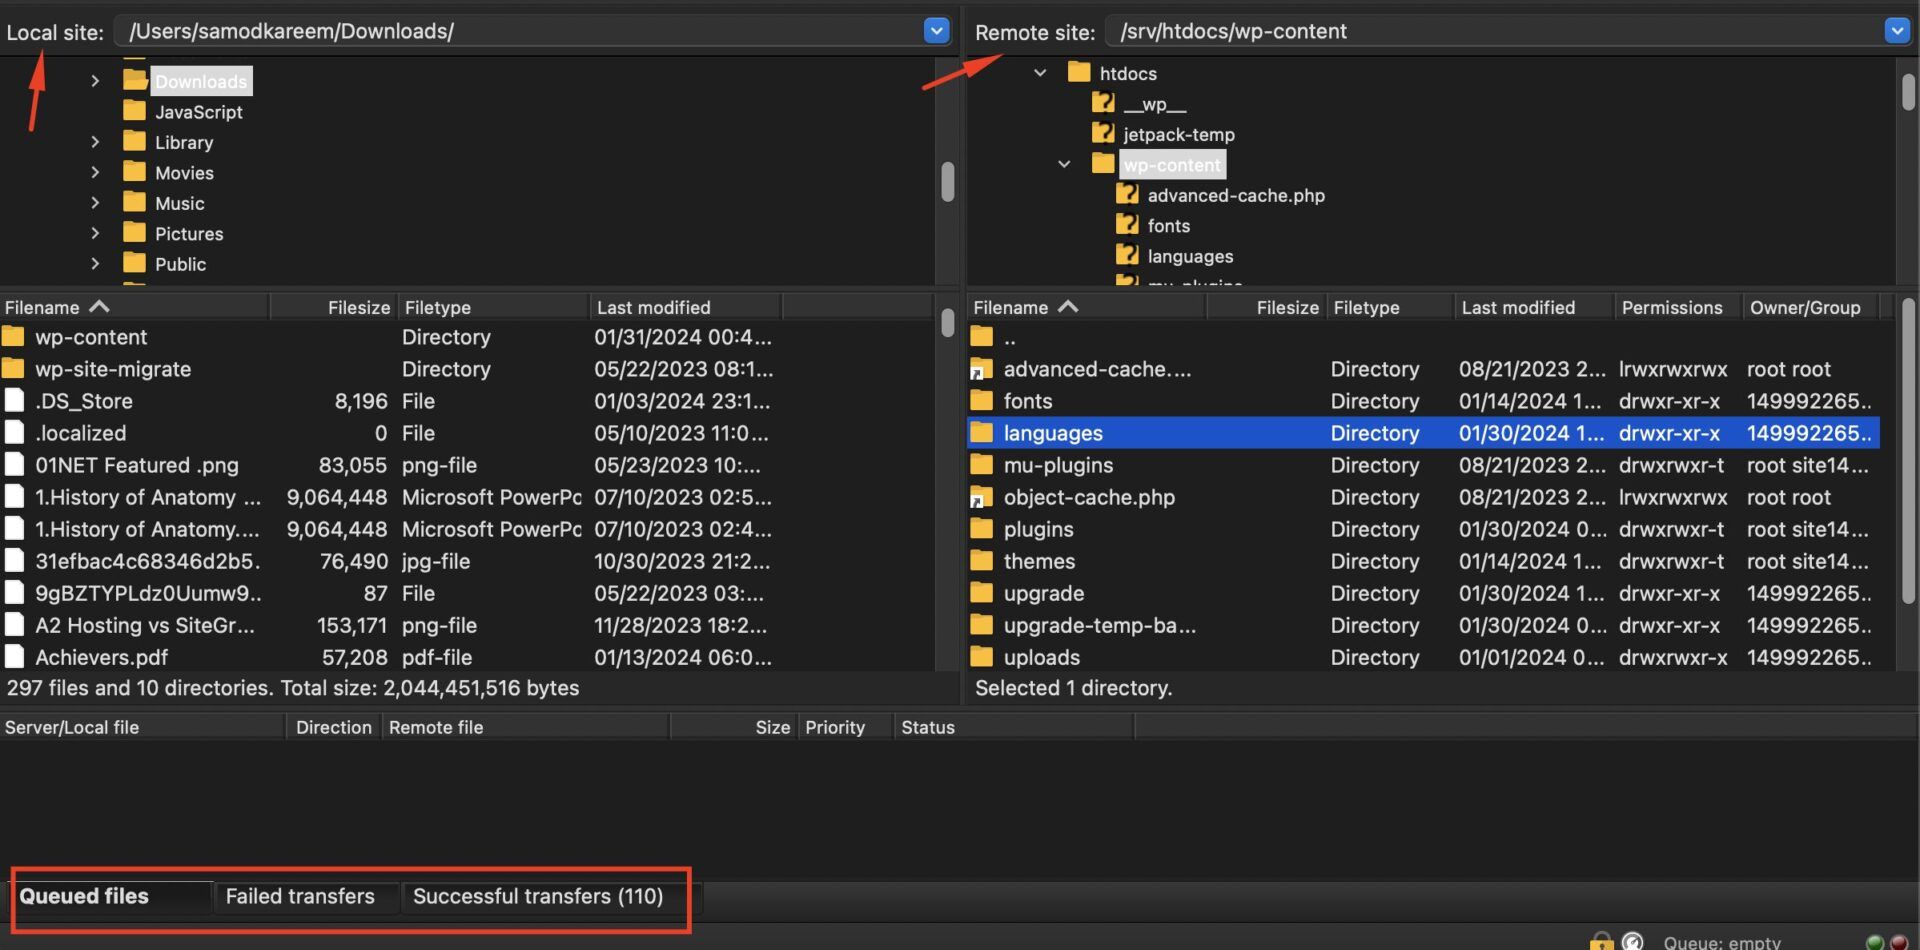
During the transfer, you can monitor the progress and see which files are in the queue, are successful, or have failed. For WordPress websites, ensure to export the whole content of the public_html folder.
3. Export Your Database(s)
Databases are the backbones of every dynamic website. They contain all the information about processes and settings on a site that change from time to time. By default, every website would have a database. However, the content of this database will be determined by whether the website is static or dynamic. For static sites, the database is usually empty and widely considered unnecessary to transfer.
On the other hand, dynamic sites have well-established databases that must be exported for a website to keep running smoothly. What contributes to the content of a site’s database includes dynamic content that changes due to certain conditions and user-generated content. In our opinion, always export your database even if you think your website doesn’t use it (especially if there are tables in it).
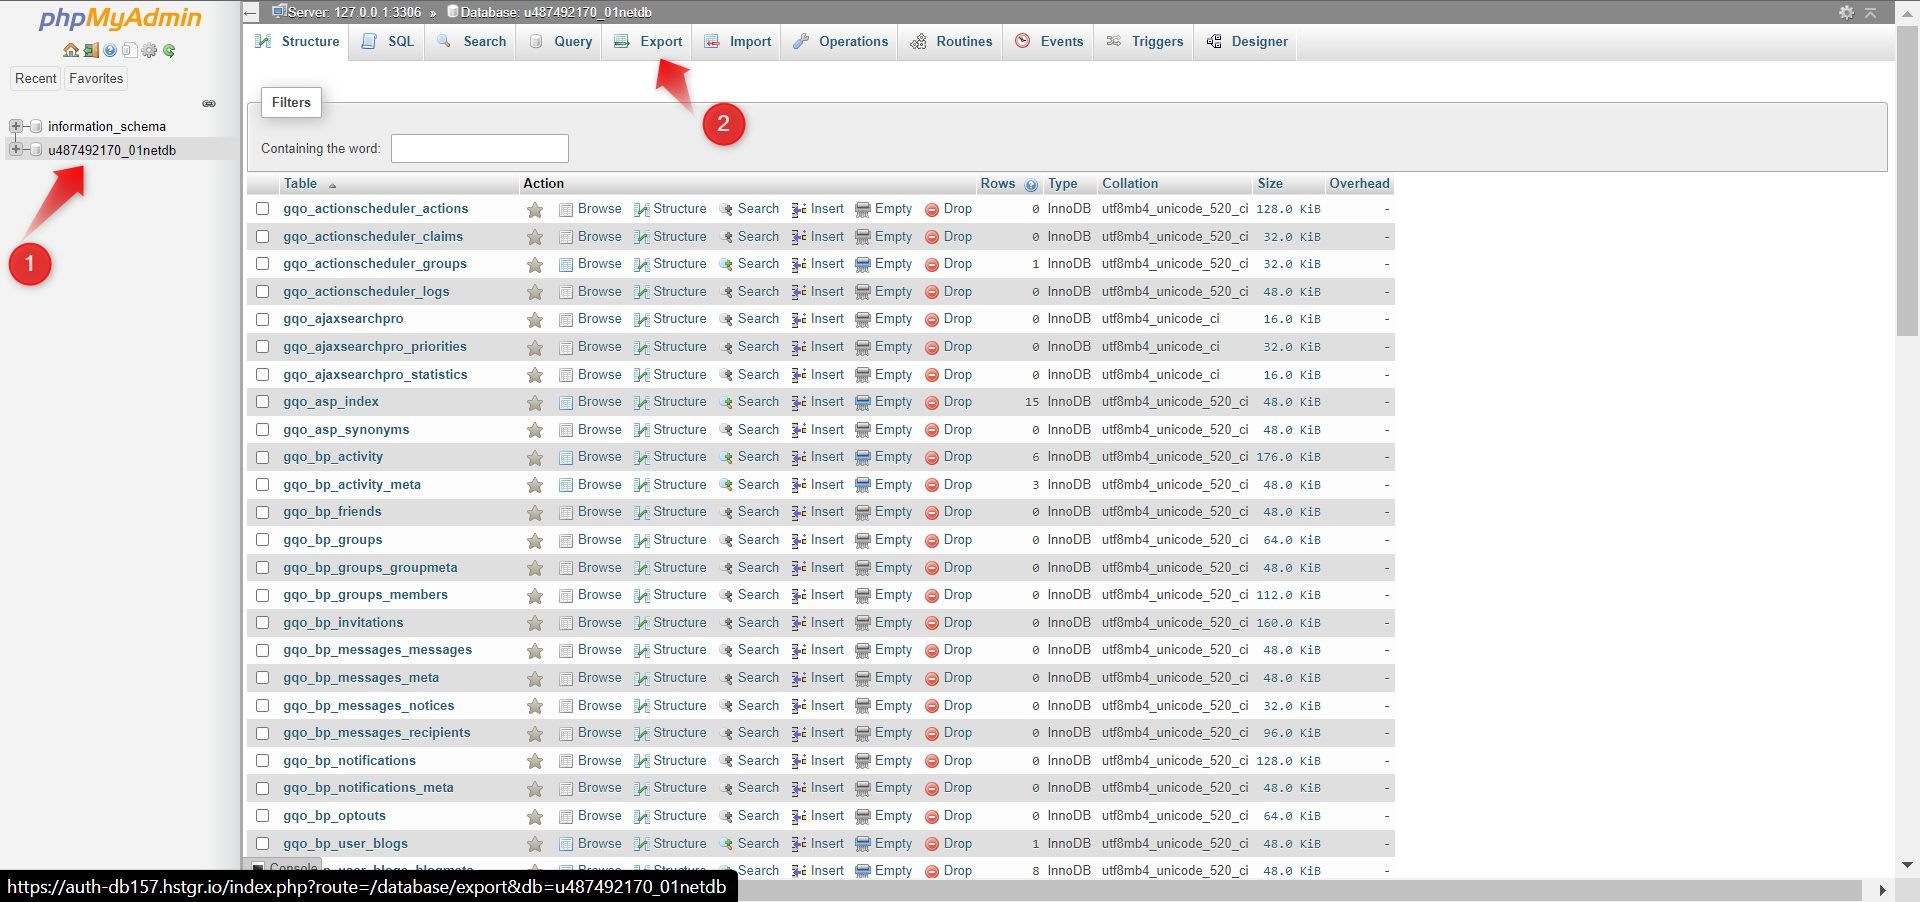
There are many types of databases and the one we would discuss here is the most common one, MySQL. phpMyAdmin is the tool we use to manage MySQL databases. Hence, you need access to it in order to export your databases. Most web hosts have direct links to your phpMyAdmin tool right on your dashboard. So, you won’t need login credentials.
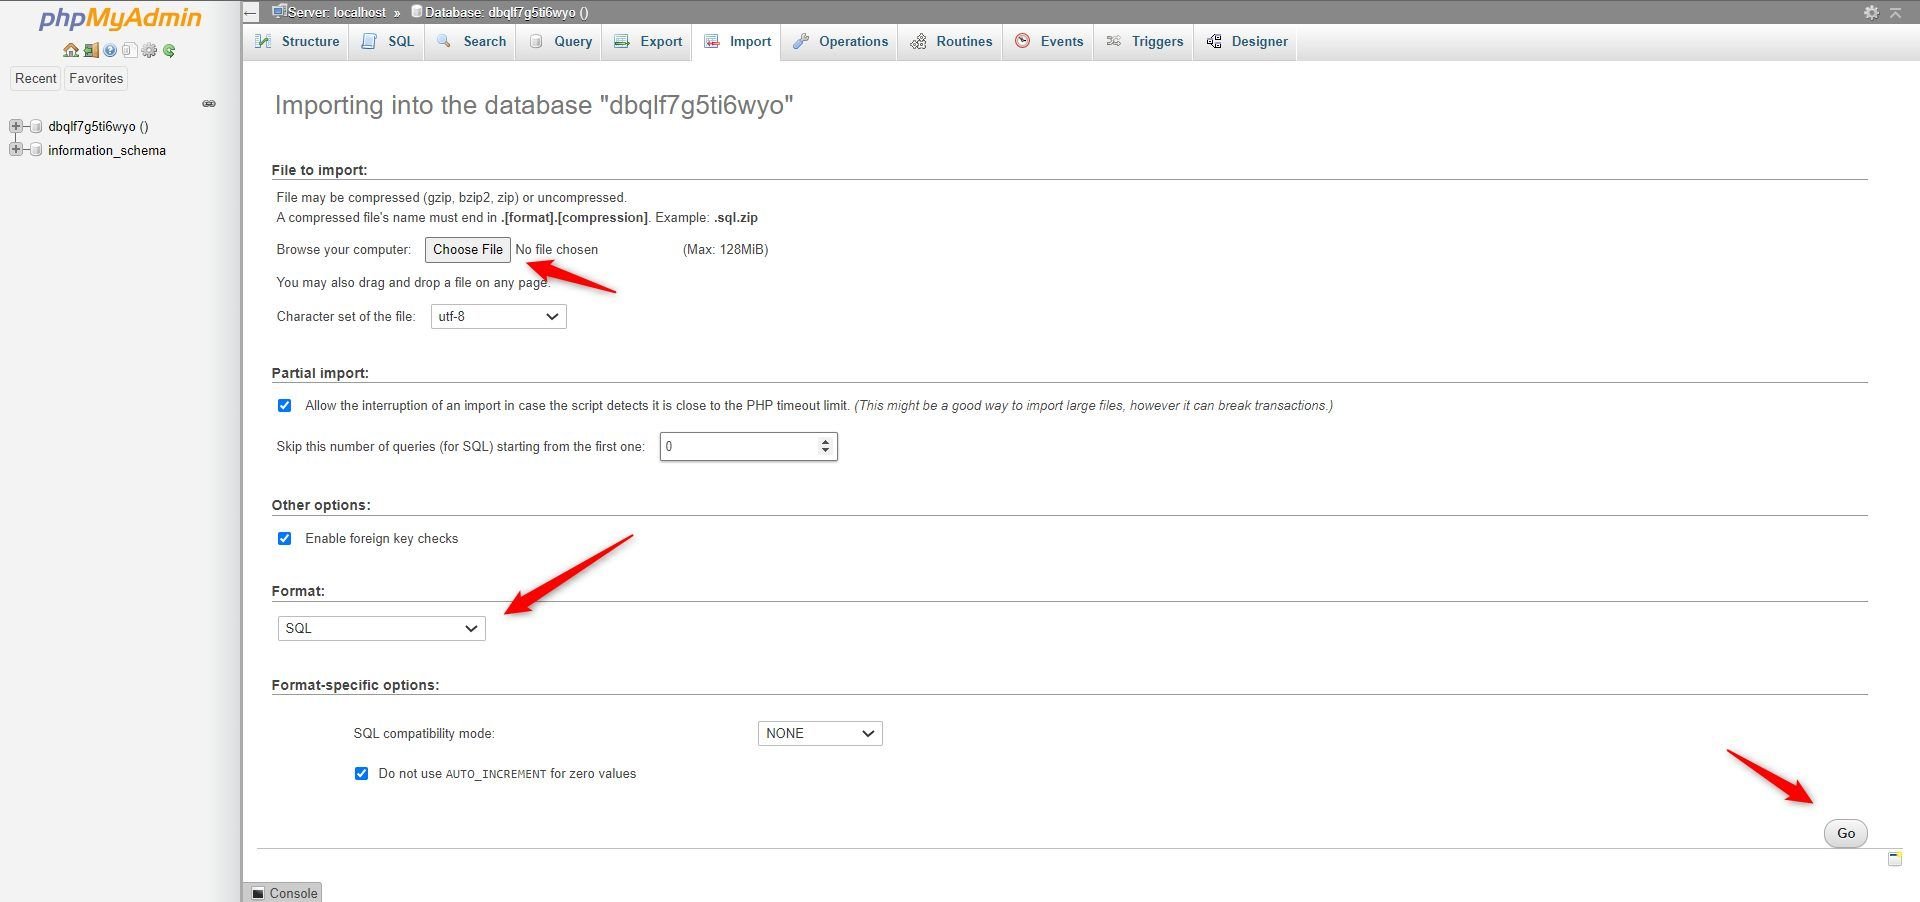
Here is how to export your databases using the phpMyAdmin tool:
1. Find the phpMyAdmin tool from your control panel and click on it. For cPanel, you can find this under the Databases section. If your web host uses a custom control panel, there would be a link to it there as well. Contact the support if you have issues finding it.

2. Once your databases page opens, choose the correct one from the list in the left sidebar. Afterward, click the Export button at the top of the page.
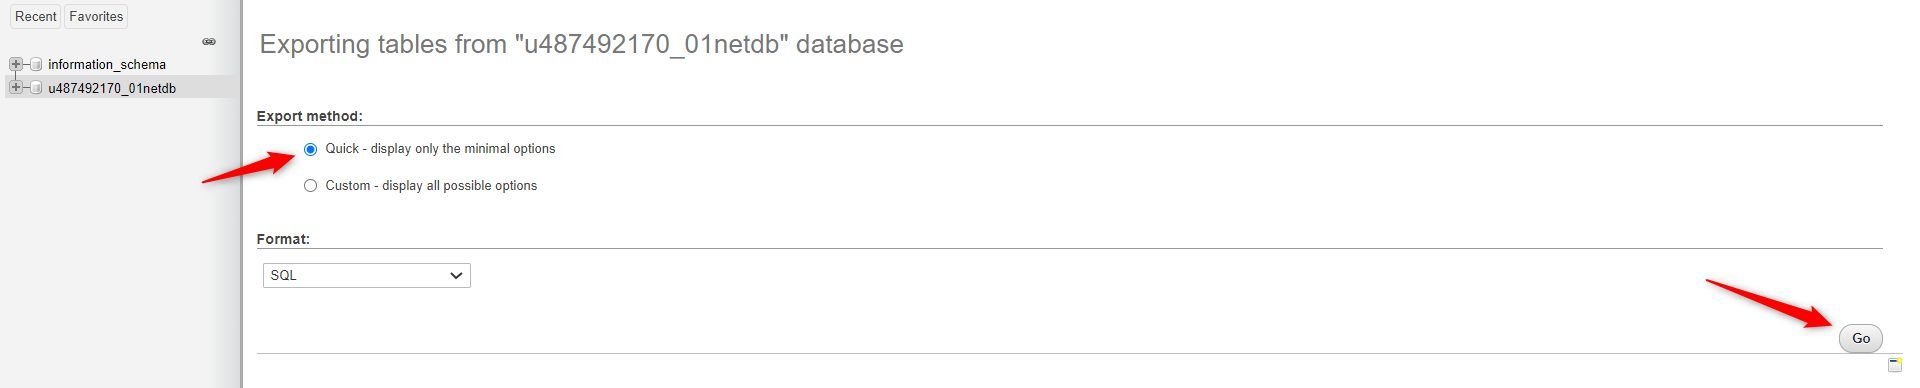
3. On the next page, choose the Quick option and leave the format on SQL. Click the Go button to export the file.
4. Once the exported file has been downloaded on your computer, you can move it to the folder you created earlier for easy organization.
In case you use more than one database, repeat these steps for the other ones too.
4. Check and Update Your PHP Version
If you are using a PHP-based CMS platform, you need to check the PHP version of your site before you begin any operation on the new host. PHP has many versions with each update revealing different functionalities that could be useful to users. Some of these versions have functionalities that are not compatible with others. Thus, migrating a site on PHP 8 to a PHP 7.2 installation and vice versa may cause issues.
Generally, you can check the PHP version of your website from your control panel. In the case of cPanel, you can see your current PHP version under the Software section. After scrolling to this section, click the Select PHP Version link and you will see that information on the next page.

Once you have your current PHP version, log on to the control panel of the host you want to migrate your site to. Look for the advanced settings and find a way to know your current PHP version for that new site. If it is the same as the one you had with the former host, you don’t need to do anything. Otherwise, change it so that it matches the version of the site you are moving in.
Note that if your current PHP version is lower and you see access to the latest ones, you need to do this after fully migrating your website and not before.
5. Upload Your Site’s Files
Now that you have your files and databases, you have successfully duplicated your website. The next step when moving your website to a new host is to upload the files on the server of the new provider.
To do this, you need the FTP details for your new website. If the FTP account has not been created for you yet, you can quickly do this by following the instructions of the host. Once your account is ready, log in to your server using FileZilla just like we did when exporting the files.
This time, the Local Site still remains your computer but the Remote Site is now your disk space with your new web host. The aim here is to move the files you downloaded or exported (from your current website) from the Local Site part to the Remote Site.
Just like we did before, you can drag and drop the files you exported to the destination folder on your new site. Alternatively, you can right-click on the files/folders under your Local Site and choose the Upload option in the dropdown.
Note that you need to have opened the destination folder on the Remote Site for this to work as expected. Otherwise, you would be uploading to the wrong folder and causing issues that could prevent the success of the migration.
6. Create and Import Your Database(s)
Many websites need databases to operate correctly. So, most of the time after migration, websites might not work unless the database has been imported and linked correctly.
The first action to take is to create a new MySQL database from your control panel. When creating a MySQL database, the parameters to take note of are the database name, database username, and the password. Ensure to note these values somewhere for easy access.
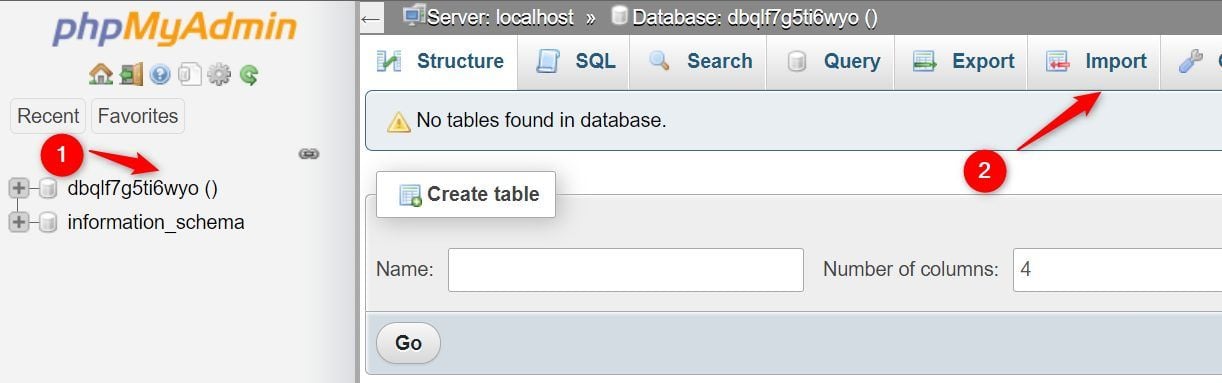
Once you have created your database, open your phpMyAdmin to open it and see the available tables. Typically, this should be empty.
Now, navigate to the top menu bar of the page and click the Import button.
Click the Choose File button and pick the format of the database file you want to upload. The default format is SQL but you can change this if you exported your database in a different one. Click the Go button afterward. The database should be uploaded immediately, depending on the size.
After the upload, you may need to indicate where your database is located in your website files. While this must have been indicated already on your current site, the values would have changed on the new one. In the case of a WordPress site, you must indicate the name, username, and password of the database in the wp-config.php file. Otherwise, there would be issues preventing certain operations from working smoothly.
7. Migrate Email Services (Optional)
Not every website has email services. Thus, this step may not necessarily apply to you. If your current web host provides free email hosting services, then you will lose access to your mailboxes when you switch to another provider. As a result, it is advisable to migrate your mailboxes and messages over before your hosting plan expires.
Every web host has a different email migration tool with distinct processes to follow. Nevertheless, most hosts will only require you to provide login information for individual mailboxes. This will, most of the time, include the email address, password, server IP address, and port value.
If you are looking for free email hosting, Hostinger and SiteGround are excellent recommendations.
8. Test the Website
Many issues can occur during the migration of a website from one host to another. Hence, after the site transfer, the best action to take is to test the website to know if it is working as it should or not. Now, testing a website before actually pointing your domain name to it can be a bit difficult with most hosting providers. Most of the time, these hosts allow you to clone your installation on a staging URL and test the website. Others provide provide temporary URLs that you can use.
During the tests, ensure that you check all the internal links on your website to confirm that they all point to the right destination. See to it that there are no broken links on your website at all. At the same time, ensure that all images were imported correctly and the designs of your pages are intact. If anything is not right, find ways to correct them before making the site available to the public. So basically, test the website to ensure it doesn’t work differently from what you migrated to it.
If you are unable to get the way to test your website before pointing it to your domain name, search the Help Center of your new host for a guide. Further, you can contact the customer support team for assistance if you are unable to get things done on your own.
9. Update Your DNS Settings
Once you have finished testing your website, the next thing to do is update your DNS settings. Your DNS records are what tell your browsers which server to query when there are requests for your web pages.
So, you need to go to your domain registrar’s website and change the name servers to the new host’s. This way, visitors will start getting directed to the website you have migrated to the new host but they won’t notice any changes. From that time, only the changes you make to your website with the new host will show to visitors accessing your URLs.
The reason why we recommend fully migrating your website to the new host and testing it before updating your DNS settings is to prevent downtimes. At the same time, by testing the transferred website first, you can avoid showing a faulty version to your visitors and causing issues for yourself.
After updating your DNS records, ensure that you re-test your website to be sure it works well with your domain name too. It is after your website passes this test that you can rest, assured that everything is correctly set.
10. Transferring Your Domain Name
If you want to transfer your domain name to your new host (which is also a registrar), we recommend it as the last step.
This is because domain transfer takes several days. During this time, your domain name will continue to work but you cannot update its DNS settings. So, if you initiate a domain transfer before successfully migrating your site, it may not be possible to prevent downtime when issues arise. That said, doing this when the domain name is pointing correctly and the site is working, gives no issues.
To transfer your domain and bag one year of free domain registration, Hostinger, InMotion, and DreamHost are great options. You must get an annual subscription for an eligible plan in order to redeem this offer.
Summary: How to Transfer a Website
Moving a website to a new host entails so many easy steps that are standard. This is regardless of where you are moving from and where you are going. Yet, some of the processes can vary simply because different hosts have their preferred/distinct control panels.
To migrate your website to another provider, you need to export your files and databases from the current one. Afterward, you have to upload these exact files to your website server with the new host. If you don’t want to manually export and import your files, you can request a migration service from the new host.
Many hosts like Hostinger provide an unlimited free migration service while others have limited offers. What’s more, certain hosts like SiteGround, DreamHost, etc., have free automated migration plugins for WordPress sites.